- Advantos ERP v7 Online Documentation
- Admin Manual
- Contact Us
Set up Signature Font(s)
|
IntroductionSignature fonts are nothing more than soft fonts loaded into a printer, then used by an application. Advantos Enterprise makes this process as simple as possible, and separates the process of getting and installing the font into a printer from the process of configuring the Advantos Enterprise application to use the font. This documentation describes a simple method of obtaining a signature font, setting up a method for installing and uninstalling the font into a printer, and, finally, the method to configure use of the font in Advantos Enterprise. Obtain the FontObtaining a font is as simple as contacting a vendor who specializes in creating signature fonts. These fonts, used by Advantos Enterprise, should be "PCL" fonts, not "True Type" fonts. "PCL" fonts are much easier to manage from a non-Windows application and work very well on Linux servers and printers. An example is a "PCL" font purchased from Elfring Fonts, Inc. To accomplish this, simply download the proper form, complete it, have the appropriate signature put on the form, then mail it in with the requested payment. The font will be sent to you either electronically, or on some media (C/D or floppy) in a zip file. The zip file will contain files like those listed below; which are the font (usually a .bin or .usp file), a download utility (usually download.exe), documentation for this download utility, and a DOS batch file (usually the .bat file) to automate downloading the font.
Installing the FontPCL soft fonts are easy to install. They require an escape sequence (including a font ID#) that is sent to the targe printer. You can read about PCL font management by reviewing the PCL Reference Manual at the Hewlett Packard web site (this .pdf is 3MB in size). When you send this escape sequence to the printer it doesn't print anything. This "uploading" of a soft font can be done by entering the appropriate escape commands into a .txt file, then sending this .txt file to the printer. The usual DOS command to do this might look like:
         >copy /b sig095.usp LPT1:
         >copy sig095.tst LPT1
...where sig095.tst simply contains the following escape sequence:
[esc](77XABCD[esc](3@
...which prints the signature. Automating Font InstallationAutomating font installation also includes company security. If the font is not installed in the printer than the printer cannot print a signature. Therefore it is important to control the use of, and access to, the signature font files. It is advisable to create two separate DOS batch files; one to upload the font to the desired printer, and one to delete the font from the same printer. Shortcuts to these files can be created on a secure Windows desktop. This way users can click on an icon to upload the signature, print the checks with the signature, then click on an icon to remove the signature font in order to maintain security. The two batch files look like (where [esc] represents ascii char(27)):
         SigUpload.bat
         001 net use lpt1 \\checkprnt\hp2420 /p:n
         002 E:\SigFonts\download E:\SigFonts\sig095.usp lpt1 77

         SigDelete.bat
         001 E:\SigFonts\download E:\SigFonts\SigDelete.txt lpt1 -rd
         002 net use lpt1 /d

         SigDelete.txt
         001 [esc](3@
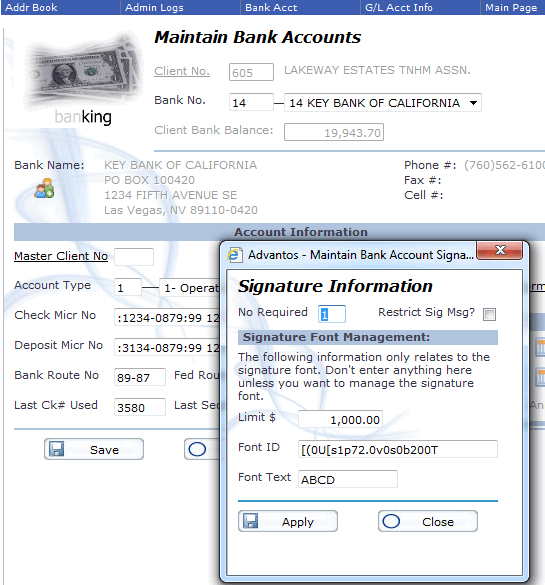
The paths and printers above are for illustration only. Your paths and printers will probably be different, so be careful. Configure Advantos Enterprise to use Signature FontAdvantos Enterprise is simple to configure. Each bank account can be configured to print a signature (only one signature). The configuration simply identifies the font# used in the "SigUpload.bat" above, and the string to print that represents the signature (usually "ABDC"). You can enter the font characteristice instead of a font#.
To configure Advantos Enterprise to use signature fonts, login and get to the banking module menu. Go to the bank account maintenance process and selection field# 8. Complete the appropriate information then file the record. Only one signature can be used per bank account. A limitation can be placed on the amount a check is issued for with a signature. Any signature can be assigned to a bank account. There is no global configuration for all bank accounts. Install 'lpr' Feature onto the Windows PC used for Check WritingThe "lpr" feature has to be installed via "Optional Features > More Windows Features > Print and Document Services". Make sure both LPD Print Service and LPR Port Monitor are both checked. This will allow a binary file to be copied directly to the printer without any interference by Windows print drivers. |


