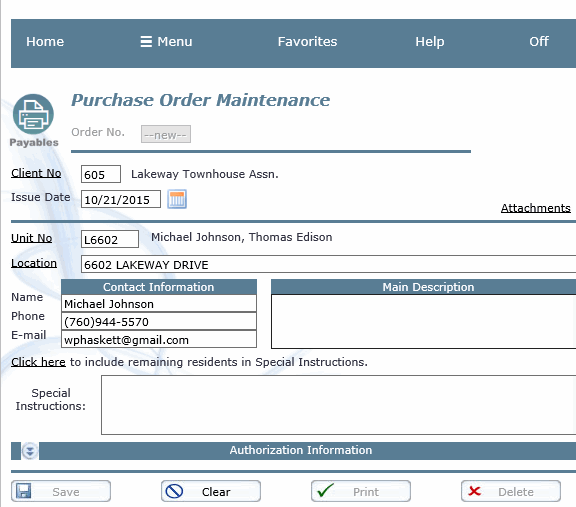
Maintaining Purchase/Work Orders
This system utility is designed to create work orders which allow the creation of a work request and the management of that request through authorization, approval, and payment. Work orders are referred to as purchase orders in the A/P module. See administrative help for additional information.

Order No
You may type in the Purchase Order number in this field, or click on one of the following link options:
New -
This option assigns the next available number to the new Purchase Order.
Search by Client -
This option allows you to search for purchase orders by client number.
Search by Location -
This option allows you to search for purchase orders by address location.

Client No.:
Enter the client number or click on the Client No link in order to select a client number from a list.
Issue Date:
You can enter any date you would like. If you enter "t" today's date will be posted.
Unit No.:
This field requires you to enter the unit number that will be associated with this work order, if applicable. If a unit has been selected, then the location and contact information will be populated to match the unit number entered.
Location:
This field is used to enter the location where the work will be performed. If needed, you may type in a location different from the unit address.
Contact Information:
Use these fields to enter the name, phone, and email contact information for the Purchase Order. Note: if this work-order is for a unit owner in your portfolio then the information from that owner's address book will be pre-loaded, including their phone# (if they have one) in cell#, work#, and home# order.
Main Description:
This blank field is for describing the overall work being requested. More focused descriptions should be entered in the Categories and Category Descriptions fields in the Authorization Information section below.
Authorization Information:
Click on the expand arrow to display the authorization information section. This should be entered after the request information is completed. This table contains the following fields:
Click here to include remaining residents in Special Instructions.
If you click here then the remaining residents will have their names and telephone#s loaded into the Special Instruction field below.
Special Instructions:
This field is used for entering any special instructions that should appear on the Purchase Order.
Authorization Information
-
Vendor No. - Enter the vendor number or click on the Vendor No link in order
to select a vendor number from a list.
<Type of Order - Select one of the two order type options from the drop-down list.
Single-Inv. means this PO was issued for work to be performed and a single
vendor invoice will be submitted for payment. Multi-Inv. means this PO was
issued for work to be performed and the vendor will submit more than one invoice
for payment.
Authorized by - This field is used to enter the logon ID of the individual authorizing
this PO. You may type in the ID of the authorizer if the authorizer is not the logged
on user.
Estimated Completion Date - Use this field to enter the date the goods/services will
be delivered or completed.
Estimated Completion Cost - Use this field to enter the estimated cost of the goods/
services that were ordered. The A/P system will be alerted if the invoice on these
goods/services exceeds the amount entered here.
Date Completed - If the work order is closed with the A/P invoice process, the invoice
date will be used as the completion date. Otherwise, enter the date the purchase order
was actually completed.
Actual Cost - Use this field to enter the total cost of all A/P invoices posted against
this purchase order to date.
Date Closed - This field is where you enter the date the purchase order was closed. If
the PO was closed with an A/P invoice, then this date will be the date the invoice is
paid.
Category - Select the category of the specific work being authorized by clicking the
Category link and selecting from the available options.
Description - Use this field to enter the description of the category selected. You can
enter up to 100 characters per description.
Buttons
-
[Clear] - Click this button to reset the entire form.
[Save] - Click this button to save the data on the form. As a general rule, don't
click this button to reset the form, use the [Clear] button to do that.
[Delete] - Click this button to delete the work order. A Work Order cannot be deleted
if there are A/P invoices associated with it, or the Work Order has been closed or
someone else authorized the PO.
[Print] - Click this button to send the work order to the printer.
[Send Email] - Click this button to send the work order as an email. Upon clicking
this button a dialog will open where the vendor's email address will appear next to
a checkbox. Select this checkbox to include the vendor's email to receive the work
order. If you wish to send the email to another party you can enter any email
address you want (and validate it of course).
Email Notes
The "Reply-to:" address is configured in the Advantos Tools module. The primary reply-to address for a work order is configured. If it is empty then general reply-to address is used. If that is unavailable the corporate client's primary email address is used. If that is unavailable then configured sender's address is used. Finally, if that is unavailable "info@advantos.net" is used. Finally, all of this can be overridden by entering a primary email address in a client's address book. This ensures an on-site manager can receive and manage all work orders.
