- Advantos ERP v7 Online Documentation
- Admin Manual
- Contact Us
Maintain Bank Accounts
|
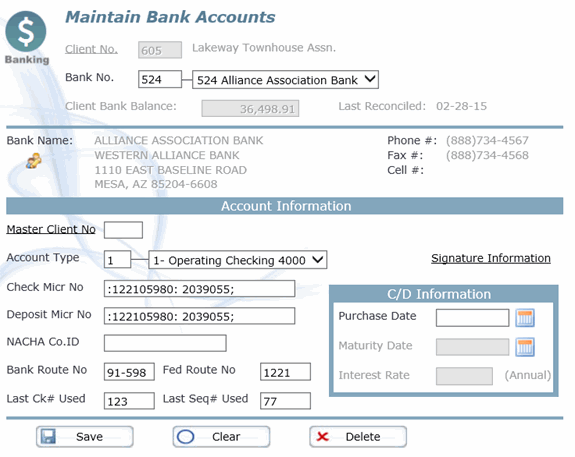
IntroductionThe purpose of this process is to ensure bank accounts are added to the database correctly so transactions from modules will be properly reflected to the correct client, and check printing and depositing data is correct. Generally, you simply add a bank account, with a zero (0) balance forward, then enter the appropriate bank account data so the rest of the system can utilize this data. Should you have a balance forward, the general rule is to enter the account with a zero (0) balance forward, then make a journal entry to recognize the balance forward as a prior period adjustment.
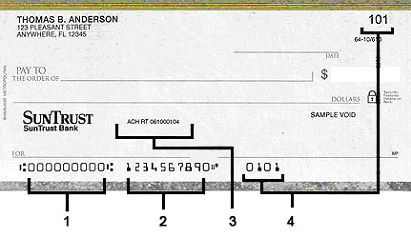
Assign a System Number to a Bank AccountBefore you can add a bank account to a client, you must add the client to the system. The system will assign a bank ID number to the bank account automatically. If this is the first account for the Client selected then you will be prompted to assign this account as the one where checks are issued from and deposits are made to. Note, however, if you don't answer this query properly, you can simply go to the Client Maintenance program and update the fields for 'Dep Bankacct' (the account where deposits are made to) and the 'Pmt Bankacct' (the account where checks are issued from). Normally these two accounts are the same. This program usually does this for you automatically. When you access the Maintain Bank Accounts process, the displayed screen requires the entry of the client number. If you want to add a bank account to the client, simply press [Enter] in the Bank ID field and the system will assign the next available ID number to the client. Once an ID number is assigned, it cannot be changed. Bank Name, Branch, and AddressThis information should be taken from a client's bank printed check or deposit slip and entered through the Address Book Maintenance. It will be printed on the laser-printer generated checks prepared in A/P and Payroll and deposit tickets prepared in A/R and T/R. Master Client#The master client# is the client that controls this bank account. Control is defined as the client whose address book data is printed on the check. Normally this value is blank because the displayed client is the one that controls the account. However, if more that one client is associated with this bank account, and this field has a value, a single check is prepared for each vendor, even though multiple client#s paid the vendor. In addition the address information of the master client is printed on the check. To leave blank just press [Enter]. If a value exists delete the value if it isn't needed. Add Bank MICR Number (assigned by bank)There are two (2) MICR (Magnetic Ink Character Recognition) data fields you need to concern yourself with. The first one is the MICR characters printed on the bottom of checks issued. The other is the MICR characters printed on the bottom of deposit tickets prepared. Normally these two numbers are the same, however, some banks use different numbers on their deposit tickets than the numbers on their checks. Below is an image of a personal check:
This MICR number consists of three parts: the Federal routing and transit number, the local bank account number, and the check or transaction number. Each part is surrounded by special MICR characters that separate one data field from another. The Advantos Enterprise application creates business style checks, as opposed to the above personal style checks. This means the transaction number is placed in front of the Federal routine and transit number, as it appears on the MICR line of the check/deposit document, and is surrounded by the On-Us characters. The basic routing number, devised by the American Bankers Association (ABA) in 1910, has served to identify the specific financial institution responsible for the payment of a negotiable instrument. Originally designed to identify only check processing endpoints, the routing number system has evolved to designate participants in automated clearinghouses, electronic funds transfer, and on-line banking. The ABA Routing Number (a.k.a. ABA number; Routing Transit number) has changed over the years to accommodate such things as the Federal Reserve System, the advent of MICR, and the implementation of the Expedited Funds Availability Act (EFAA). A routing transit number (RTN) or ABA number is the nine digit code on the bottom of negotiable instruments such as checks that identifies which financial institution it is drawn upon. This code is also used by the Automated Clearing House to process direct deposits and other automated transfers. This system is named after the American Bankers Association, which designed it in 1910. The first two digits of this nine digit number must be 00 through 12, 21 through 32, 61 through 72, or 80. 00 is used by the United States Government. 21 through 32 were assigned to thrift institutions through 1985. 61 through 72 are used for electronic transactions. 80 is used for traveller's checks. It is absolutely critical this number is entered correctly. If errors are made, either in the spacing or in the separator characters between the numbers, the checks may not print, or may be rejected by the MICR equipment at the bank, resulting in extra bank charges. There are fourteen special MICR characters used by Advantos Enterprise:
The following four (4) characters depend on the particular font you are utilizing with your printer. Some fonts use different characters to represent the following symbols. Be careful about this if you are using different printers with different fonts.
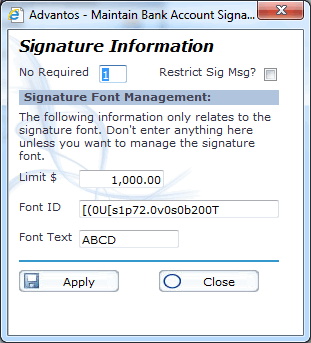
Add Bank and Fed Routing NumbersThese are the fractional value also used to identify the bank the check is drawn on. It should be obtained from the or from their supplied documents or Printers Spec Sheet. NACHA Company ID:In a NACHA file, the company header record (defined by code '5') uses a company ID to determine which bank account funds should be transfered into (or out of). This is accomplished by using the HOA's federal tax ID# as the company id. However, there are times where a federal tax id# might be used for multiple clients. In this instance, the bank normally will assign another unique company ID#. If they do then they normally will assign unique company ID#s for all of the management companies clients. If the bank assigns a unique company ID# to a bank account then enter that number here in this field. This field will normally start with the number '9' and must contain ten digits. Make sure the bank gives you a 10 digit number starting with the number '9'. Determine Last Check# UsedWhen adding a new client, they may wish their new checks to begin where their old checks left off and you can simply add the next check number in their series. If the client wishes to start as if a new account, start with 1001 which is what banks use to indicate a new account for a business. Signature InformationThis information consists of four separate pieces of information; one required and three optional. The following is a description of this signature information:
In order to activate the automatic check signing there can be only one (1) signer required for checks, as only one (1) signature can be printed on a check. The other information must also be entered to activate automatic check signing. The Limit$ will define the maximum amount of each check, issued by the selected bank account, where if exceeded then no signature will be printed. The Font ID will be included in the print string to call the font and immediately print the Font text. This will print the signature. Printing the signature assumes the font resides in the PCL printer. Make sure it is installed (or downloaded). Use whatever software is provided by the font manufacturer to do the download. You can also remove the font, if it was downloaded, when checks are finished printing. Last Bank Sequence# UsedThis value is automatically set to '0' when adding a new account and increment by one for each bank transaction processed. This value can only be changed by a system administrator and should not be changed. Select Account TypeThe Account Type information is printed on Bank Statement Reports, allowing you to easily distinguish between multiple accounts for one client. In addition, it also ties balances to the correct G/L account number, either cash or investments. Purchase DateThis is where you can identify a bank account as an investment instrument. This field, and the next two fields, are associated with each other and comprise the information required to identify a bank account as an investment instrument. Either all three fields have data or none of them do. This field contains the date this investment begins to accrue interest. You can continue to use the same account for multiple investments, as each one matures and a new one is purchased. Maturity DateThis is the date the investment will cease earning interest and "mature". Interest RateThis is the annual rate of interest the investment will earn for the period between the date the investment was purchased and the maturity date. Special Notes:If you want to add a new bank account for a Client, you can associate this Client to an already
already existing bank account. This is a special feature to allow the
sharing of bank accounts between Clients. When you enter a bank account# of
an already existing bank account, but one not associated with the Client entered,
then a message will be displayed alerting you of this fact and request assurances
you know what you're doing. You will have to respond in the affirmative
(by entering Be extra careful when you enter a non-zero value in the 'Beginning Balance' field of a bank account you're either adding or associating for the first time. By entering a value in the field, you DO NOT update the General Ledger system and you will have to create a journal entry to recognize this balance forward on this Client's set of books! |


